This pattern assumes that you know how to warp and thread your loom and weave plain weave.
Materials:
2 balls Ashford Tekapo 8 ply (100% wool, 200m/218yds 100g/3.5oz) - you will probably only need 1/2 of the 2nd ball or similiar weight wool yarn. I used the colour "Grape"
5-10 yards Noble Fibre Mill Corespun or similiar thick solid yarn for "scribbing". I used 5.5 yards for my scarf. The colours are unnamed and usually made in unique sets of 4 skeins. Noble doesn't yet have a commerce website, so I will have a few colours available in 10 yard increments in my Etsy shop.
Equipment:
Rigid Heddle loom with one 5 or 10 dpi heddle (the project is written for a warping width of 12-1/2" but you can adjust if your loom is narrower, see notes under warping)
1 pick up stick
2 stick shuttles
Piece of ribbon 65" long and 3 safety pins for measuring
tapestry needle for hemstitching and sewing
Warping:
Using your favourite method warp 62 ends at 5 ends per inch 90" long.
If direct warping with a 5dpi heddle you should have a loop in each of 31 slots.
If direct warping with a 10dpi heddle you should have a loop in every other slot starting 6-1/2" from centre.
If your loom is narrower, warp as wide as you can, or wish to.
Wind on and thread the heddle, tie or lash on and weave a few picks of scrap yarn.
Weaving:
Wind a stick shuttle with Tekapo, leave a long tail for hemstitching and weave 6 picks ending with a DOWN shed, beat softly for a balanced weave, you should have about 1" woven. It will look a little sleazy on the loom, but off the loom and wet finished it will look and feel lovely.
Hemstitch, using your favourite method. I like the one from "The Weaver's Idea Book" by Jane Patrick. This tutorial from PurlSoho is a different method which also works.
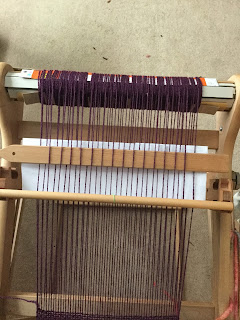
Place the pickup stick:
With the heddle in the down position pick up every other slot thread starting from the right with down 2 then up 1 down 1 across ending with 2 down. (in the photograph the paper I used to make it clearer seems to have missed the 2nd from the right slot thread, there ought to be another thread in that gap)
Push the stick to the back beam where it will stay when not in use. Wind another stick shuttle with the corespun.
Start the "scribble" yarn. Noble's corespun is a tight wrap of roving (usually wool and some mohair) around a spun yarn core. To anchor the corespun in the weaving invisibly you need to remove the wrapping from an inch or two of the core:
Now decide where you want to start your "scribble". I started in the middle. With the heddle in UP position tuck the exposed tail of the corespun into the shed for 1" wherever you would like it to start.
Throw a shot of Tekapo weft in the same shed and beat.
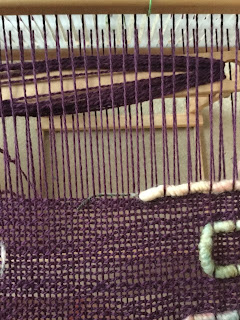
Place heddle in DOWN position, bring the pickup stick forward and put it on its edge so that it raises the slot threads you picked up.
Use the shuttle to go under the first raised thread to the left of the start of the corespun and then under as many more as you would like. I went under 3 to start. Pull out the shuttle to lay the corespun in the shed. You don't need to angle it, just lay it neatly and gently against the last pick of weaving. Don't pull too hard or you might disturb the anchor. Put the corespun shuttle aside, lay the pickup stick down flat and push it to the back of the loom. Pick up the Tekapo shuttle and place a shot of Tekapo weft in the SAME shed. Beat gently. The Tekapo weft will tuck around and under the corespun.
Now weave 7 more shots of plain weave with the Tekapo (your last shot will be in an UP shed).
Place the heddle in DOWN and bring the stick forward and on its edge. From now on, I'm going to call these raised threads the "tie downs" because they tie down the corespun scribble to the ground cloth.
Stop here and take a picture or make a note of which tie down thread the corespun started at and in which direction it went. You need to know this so you can land in the same spot at the end.
Pick up the corespun shuttle and start it under the same tie down that it came out of on its last shot going in the opposite direction. Go under as many or as few tie down threads as you like (but no fewer than 2) then bring the shuttle out and adjust the corespun yarn so it makes a neat line fairly snugly around the tie downs at the turning end. Put the corespun shuttle aside, move the stick to the back of the loom and throw a shot of Tekapo weft in the same shed.
Continue like this weaving 8 shots of Tekapo in plain weave between "scribbles". Watch your beat, really, at this sett, with this yarn, you want to gently place each weft shot rather than beating. Save your real beating for cotton.
The only rule I found for scribbling when I sampled is that it really holds best if you change direction each shot and you catch it in the same tie down it came out of below. When I tried to go diagonally the yarn didn't lie smoothly between the tie downs. If you are using different yarns this rule might not apply. Sampling is the way to find out, but you won't really know what will happen until the piece is off the loom and wet finished.
Clever tip #1: If you look closely at the above photo you can just see the paper towel or toilet paper tubes I have wrapped around the front beam to smooth out the beginning with the lashing on and the hemming. I slit the tubes lengthwise and they are just the right size and weight for the purpose. I have two tubes under there overlapped just slightly.
Clever tip #2: Notice the piece of ribbon running up the right side of the weaving. It's attached with 3 safety pins about 3" apart. That bit of ribbon is cut to the length I want my weaving to be measured under tension on the loom. In this case I want about 65". I've also marked it off every 12" so I know how far I have gotten. I pinned it in when I started winding on the front beam, matching the end to the hemstitching line. Every few inches I take out the bottom pin and move it to the top. Having 2 pins still in the ribbon keeps it firmly attached. This trick is especially useful if you are weaving more than one item on the same warp (which I was doing here).
Scribble away for a total of about 60". Now go back and check where your scribble yarn started. Plan your next few scribbles so that you will finish up with the end of the scribble yarn going in the same direction that you started and at the same tie down thread. Do about 4 more inches, an inch or so more or less isn't as important as ending up in the right place.
This is my last shot of corespun. I have cut the tail about 2" past the tie down I want to finish at. If you go back and look at my beginning you will see that the end of the corespun started at the tie down just to the left of the green thread that marks the centre of my heddle and heads to the left. My last shot then needs to come from right to left and end at that tie down.
Pull off the wrapping very carefully and trim it off so that the wrapping starts at the tie down thread.
Dampen and rub to taper and set the end. Move the pickup stick back then tuck the tail of the corespun into the regular down shed. Throw a shot of Tekapo and beat.
Weave 6-8 picks more then finish with hemstitching.
Clever tip #3: If you plan on doing more than item on the same warp you will probably want to cut the first one off or the the front beam could get overfilled and making getting a nice shed more difficult. To protect the threading I use bag clips (IKEA used to have them, now they seem to be available in dollar stores) to clamp the threads in front of the heddle.
Cut off the loom, leaving about 1" of fringe.
Finishing:
The cloth will have shortened a bit when the loom tension is removed. Mine lost about 3". I had to pleat it a bit to fit it in the photo.
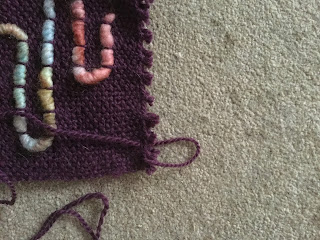
Take a length of Tekapo in a tapestry needle and weave it up the last inch or so of the right edge of the right side of one end of the piece coming out at the hem edge. That sentence was a bit awkward, this picture should clarify:
Now fold the cloth in half, wrong sides together and matching the hem stitching and stitch them together:
Use a whip stitch which means to take the needle over the top of the seam, come back through both pieces of cloth between the tufts of hem about 3 picks down and pull gently. The photo above shows the path of the yarn before I pulled it down. Don't pull too tight, you want the stitching yarn to be the same tension as the weft shots in the cloth.
Now we are going to encase the raw edges in a flat fell seam. We are also going to match up the ends of the scribbing yarns so it looks like one continuous piece.
Lay out the piece out flat with the seam open and the right side of the cloth up:
Now pleat the cloth so that the raw edge is folded inside:
Use safety pins to hold it. Notice that the ends of the corespun now butt together.
The next bit was hard to clearly photograph. Look closely at the ground cloth and find the weft shots that are right under the scribble yarns. We want to stitch these shots together. The cloth should be folded and pinned so that they match up. But first, whip stitch the three layers of cloth at the selvedge edge together to close the opening there.
Now, with the sewing yarn coming from the edge of the fold on top take your needle into the weft shot you found on the lower layer of cloth from right to left about 1/4" from the selvedge, then into the corresponding weft shot you found on the upper layer again from right to left. Try to match up the warp threads as well, it will help keep things even.
Continue across the seam in this manner, with gentle tension on your sewing yarn, and stitches about 1/4" apart. Here is the end of my seam, before I pulled up the sewing yarn.
Now, flip over the piece and lay the seam flat. As before, stitch the selvedge edges together.
Then stitch down the seam by following a weft line in the fold and in the lower layer of cloth.
Wet Finishing:
Weaving is almost never done until it has had a bath of some kind. The bath should be appropriate to the materials and purpose of the item. In this case we are going to give our scarf a very gentle, warm bath much as we would wash a knitted item of the same yarns. Gently squeeze and swish the water through the cloth. Wet finishing helps even up the weave structure and lets the yarns settle in and relax after being under tension. When the scarf is well saturated, gently lift it out and squeeze as much water out as you can without rubbing or agitating. We are not intending to full this scarf, which would be intentionally shrinking the wool yarn to thicken and tighten the cloth by abusing the cloth while wet. Lay it flat to dry.
I hope you enjoy this pattern and will look for others from me in the future. As I write more patterns they will be available through my Etsy shop which you can access from the sidebar at the top of the page.
© Elizabeth Watt November 2016
You are welcome to enjoy this technique and do what you will with the articles you make from this pattern. You are also welcome to link to and share this pattern, I only ask that you always acknowledge the source.


No comments:
Post a Comment